一 、rabbitmq的介紹
rabbitmq是消息中間件的一種,消息中間件即分布式系統(tǒng)中完成消息的發(fā)送和接收的基礎軟件,消息中間件的工作過程可以用生產(chǎn)者消費者模型來表示.即,生產(chǎn)者不斷的向消息隊列發(fā)送信息,而消費者從消息隊列中消費信息.具體過程如下:

從上圖可看出,對于消息隊列來說,生產(chǎn)者、消息隊列、消費者是最重要的三個概念,生產(chǎn)者發(fā)消息到消息隊列中去,消費者監(jiān)聽指定的消息隊列,并且當消息隊列收到消息之后,接收消息隊列傳來的消息,并且給予相應的處理。消息隊列常用于分布式系統(tǒng)之間互相信息的傳遞。
對于rabbitmq來說,除了這三個基本模塊以外,還添加了一個模塊,即交換機(exchange)。它使得生產(chǎn)者和消息隊列之間產(chǎn)生了隔離,生產(chǎn)者將消息發(fā)送給交換機,而交換機則根據(jù)調(diào)度策略把相應的消息轉(zhuǎn)發(fā)給對應的消息隊列。
交換機的主要作用是接收相應的消息并且綁定到指定的隊列。交換機有四種類型,分別為direct、topic、headers、fanout。
direct是rabbitmq默認的交換機模式,也是最簡單的模式。即創(chuàng)建消息隊列的時候,指定一個bindingkey。當發(fā)送者發(fā)送消息的時候,指定對應的key。當key和消息隊列的bindingkey一致的時候,消息將會被發(fā)送到該消息隊列中。
topic轉(zhuǎn)發(fā)信息主要是依據(jù)通配符,隊列和交換機的綁定主要是依據(jù)一種模式(通配符+字符串),而當發(fā)送消息的時候,只有指定的key和該模式相匹配的時候,消息才會被發(fā)送到該消息隊列中。
headers也是根據(jù)一個規(guī)則進行匹配,在消息隊列和交換機綁定的時候會指定一組鍵值對規(guī)則,而發(fā)送消息的時候也會指定一組鍵值對規(guī)則,當兩組鍵值對規(guī)則相匹配的時候,消息會被發(fā)送到匹配的消息隊列中。
fanout是路由廣播的形式,將會把消息發(fā)給綁定它的全部隊列,即便設置了key,也會被忽略。
二 、springboot整合rabbitmq(direct模式)
springboot整合rabbitmq非常簡單,首先還是pom.xml引入依賴。
|
1
2
3
4
|
<dependency> <groupid>org.springframework.boot</groupid> <artifactid>spring-boot-starter-amqp</artifactid> </dependency> |
在application.properties中配置rabbitmq相關(guān)的信息,并首先啟動了rabbitmq實例,并創(chuàng)建兩個queue。

|
1
2
3
4
5
|
spring.application.name=spirng-boot-rabbitmqspring.rabbitmq.host=127.0.0.1spring.rabbitmq.port=5672spring.rabbitmq.username=adminspring.rabbitmq.password=admin |
配置queue(消息隊列),由于采用的是direct模式,需要在配置queue的時候指定一個鍵,使其和交換機綁定。
|
1
2
3
4
5
6
7
8
9
10
|
@configurationpublic class rabbitconfig { @bean public org.springframework.amqp.core.queue queue() { return new org.springframework.amqp.core.queue("hello"); }} |
接著就可以發(fā)送消息啦。在springboot中,我們使用amqptemplate去發(fā)送消息。代碼如下:
|
1
2
3
4
5
6
7
8
9
10
11
12
13
|
@componentpublic class hellosender { @autowired private amqptemplate rabbittemplate; public void send(int index) { string context = "hello queue "+index + new date(); system.out.println("sender : " + context); this.rabbittemplate.convertandsend("hello", context); }} |
生產(chǎn)者發(fā)送消息之后就需要消費者接收消息。這里定義了兩個消息消費者,用來模擬生產(chǎn)者與消費者一對多的關(guān)系。
|
1
2
3
4
5
6
7
8
9
10
11
12
13
14
15
16
17
18
|
@component@rabbitlistener(queues = "hello")public class helloreceiver { @rabbithandler public void process(string hello) { system.out.println("receiver1 : " + hello); }}@component@rabbitlistener(queues = "hello")public class helloreceiver2 { @rabbithandler public void process(string hello) { system.out.println("receiver2 : " + hello); }} |
在單元測試中模擬發(fā)送消息,批量發(fā)送10條消息,兩個接收者分別接收了5條消息。
|
1
2
3
4
5
6
7
8
9
|
@autowired private hellosender hellosender; @test public void hello() throws exception { for(int i=0;i<10;i++) { hellosender.send(i); } } |

實際上rabbitmq還可以支持發(fā)送對象,當然由于涉及到序列化和反序列化,該對象要實現(xiàn)serilizable接口。這里定義了user對象,用來做發(fā)送消息內(nèi)容。
|
1
2
3
4
5
6
7
8
9
10
11
12
13
14
15
16
17
18
19
20
21
22
23
24
25
26
27
|
import java.io.serializable;public class user implements serializable{ private string name; private string pwd; public string getpwd() { return pwd; } public void setpwd(string pwd) { this.pwd = pwd; } public string getname() { return name; } public void setname(string name) { this.name = name; } public user(string name, string pwd) { this.name = name; this.pwd = pwd; } @overridepublic string tostring() { return "user{" +"name='" + name + '\'' +", pwd='" + pwd + '\'' +'}'; }} |
在生產(chǎn)者中發(fā)送user對象。
|
1
2
3
4
5
6
7
8
9
10
11
12
13
|
@componentpublic class modelsender { @autowired private amqptemplate rabbittemplate; public void sendmodel(user user) { system.out.println("sender object: " + user.tostring()); this.rabbittemplate.convertandsend("object", user); }} |
在消費者中接收user對象。
|
1
2
3
4
5
6
7
8
9
10
11
|
@component@rabbitlistener(queues = "object")public class modelrecevicer { @rabbithandler public void process(user user) { system.out.println("receiver object : " + user); }} |
在單元測試中注入modelsender 對象,實例化user對象,然后發(fā)送。
|
1
2
3
4
5
6
7
8
|
@autowired private modelsender modelsender; @test public void model() throws exception { user user=new user("abc","123"); modelsender.sendmodel(user); } |

三 、springboot整合rabbitmq(topic轉(zhuǎn)發(fā)模式)
首先需要在rabbitmq服務端創(chuàng)建交換機topicexchange,并綁定兩個queue:topic.message、topic.messages。

新建topicrabbitconfig,設置對應的queue與binding。
|
1
2
3
4
5
6
7
8
9
10
11
12
13
14
15
16
17
18
19
20
21
22
23
24
25
26
27
28
29
30
31
|
@configurationpublic class topicrabbitconfig { final static string message = "topic.message"; final static string messages = "topic.messages"; @bean public queue queuemessage() { return new queue(topicrabbitconfig.message); } @bean public queue queuemessages() { return new queue(topicrabbitconfig.messages); } @bean topicexchange exchange() { return new topicexchange("topicexchange"); } @bean binding bindingexchangemessage(queue queuemessage, topicexchange exchange) { return bindingbuilder.bind(queuemessage).to(exchange).with("topic.message"); } @bean binding bindingexchangemessages(queue queuemessages, topicexchange exchange) { return bindingbuilder.bind(queuemessages).to(exchange).with("topic.#"); }} |
創(chuàng)建消息生產(chǎn)者,在topicsender中發(fā)送3個消息。
|
1
2
3
4
5
6
7
8
9
10
11
12
13
14
15
16
17
18
19
20
21
22
23
24
|
@componentpublic class topicsender { @autowired private amqptemplate rabbittemplate; public void send() { string context = "hi, i am message all"; system.out.println("sender : " + context); this.rabbittemplate.convertandsend("topicexchange", "topic.1", context); } public void send1() { string context = "hi, i am message 1"; system.out.println("sender : " + context); this.rabbittemplate.convertandsend("topicexchange", "topic.message", context); } public void send2() { string context = "hi, i am messages 2"; system.out.println("sender : " + context); this.rabbittemplate.convertandsend("topicexchange", "topic.messages", context); }} |
生產(chǎn)者發(fā)送消息,這里創(chuàng)建了兩個接收消息的消費者。
|
1
2
3
4
5
6
7
8
9
10
11
12
13
14
15
16
17
18
19
20
21
|
@component@rabbitlistener(queues = "topic.message")public class topicreceiver { @rabbithandler public void process(string message) { system.out.println("topic receiver1 : " + message); }}@component@rabbitlistener(queues = "topic.messages")public class topicreceiver2 { @rabbithandler public void process(string message) { system.out.println("topic receiver2 : " + message); }} |
在單元測試中注入topicsender,利用topicsender 發(fā)送消息。
|
1
2
3
4
5
6
7
8
|
@autowired private topicsender topicsender; @test public void topicsender() throws exception { topicsender.send(); topicsender.send1(); topicsender.send2(); } |

從上面的輸出結(jié)果可以看到,topic receiver2 匹配到了所有消息,topic receiver1只匹配到了1個消息。
四 、springboot整合rabbitmq(fanout exchange形式)
fanout exchange形式又叫廣播形式,因此我們發(fā)送到路由器的消息會使得綁定到該路由器的每一個queue接收到消息。首先需要在rabbitmq服務端創(chuàng)建交換機fanoutexchange,并綁定三個queue:fanout.a、fanout.b、fanout.c。

與topic類似,新建fanoutrabbitconfig,綁定交換機和隊列。
|
1
2
3
4
5
6
7
8
9
10
11
12
13
14
15
16
17
18
19
20
21
22
23
24
25
26
27
28
29
30
31
32
33
34
35
36
37
38
|
@configurationpublic class fanoutrabbitconfig { @bean public queue amessage() { return new queue("fanout.a"); } @bean public queue bmessage() { return new queue("fanout.b"); } @bean public queue cmessage() { return new queue("fanout.c"); } @bean fanoutexchange fanoutexchange() { return new fanoutexchange("fanoutexchange"); } @bean binding bindingexchangea(queue amessage,fanoutexchange fanoutexchange) { return bindingbuilder.bind(amessage).to(fanoutexchange); } @bean binding bindingexchangeb(queue bmessage, fanoutexchange fanoutexchange) { return bindingbuilder.bind(bmessage).to(fanoutexchange); } @bean binding bindingexchangec(queue cmessage, fanoutexchange fanoutexchange) { return bindingbuilder.bind(cmessage).to(fanoutexchange); }} |
創(chuàng)建消息生產(chǎn)者,在fanoutsender中發(fā)送消息。
|
1
2
3
4
5
6
7
8
9
10
11
12
13
14
|
@componentpublic class fanoutsender { @autowired private amqptemplate rabbittemplate; public void send() { string context = "hi, fanout msg "; system.out.println("fanoutsender : " + context); this.rabbittemplate.convertandsend("fanoutexchange","", context); }} |
然后創(chuàng)建了3個接收者fanoutreceivera、fanoutreceiverb、fanoutreceiverc。
|
1
2
3
4
5
6
7
8
9
10
11
12
13
14
15
16
17
18
19
20
21
22
23
24
25
26
27
|
@component@rabbitlistener(queues = "fanout.a")public class fanoutreceivera { @rabbithandler public void process(string message) { system.out.println("fanout receiver a : " + message); }}@component@rabbitlistener(queues = "fanout.b")public class fanoutreceiverb { @rabbithandler public void process(string message) { system.out.println("fanout receiver b: " + message); }}@component@rabbitlistener(queues = "fanout.c")public class fanoutreceiverc { @rabbithandler public void process(string message) { system.out.println("fanout receiver c: " + message); }} |
在單元測試中注入消息發(fā)送者,發(fā)送消息。
|
1
2
3
4
5
6
|
@autowired private fanoutsender fanoutsender; @test public void fanoutsender() throws exception { fanoutsender.send(); } |
從下圖可以看到3個隊列都接收到了消息。

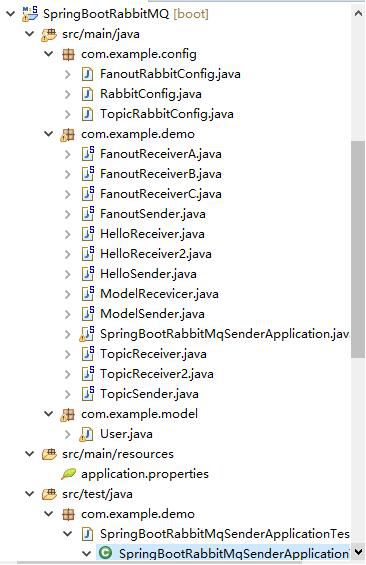
本章節(jié)創(chuàng)建的類比較多,下圖為本章節(jié)的結(jié)構(gòu),也可以直接查看demo源碼了解。

以上就是本文的全部內(nèi)容,希望對大家的學習有所幫助,也希望大家多多支持服務器之家。
原文鏈接:http://www.cnblogs.com/5ishare/p/10163318.html


