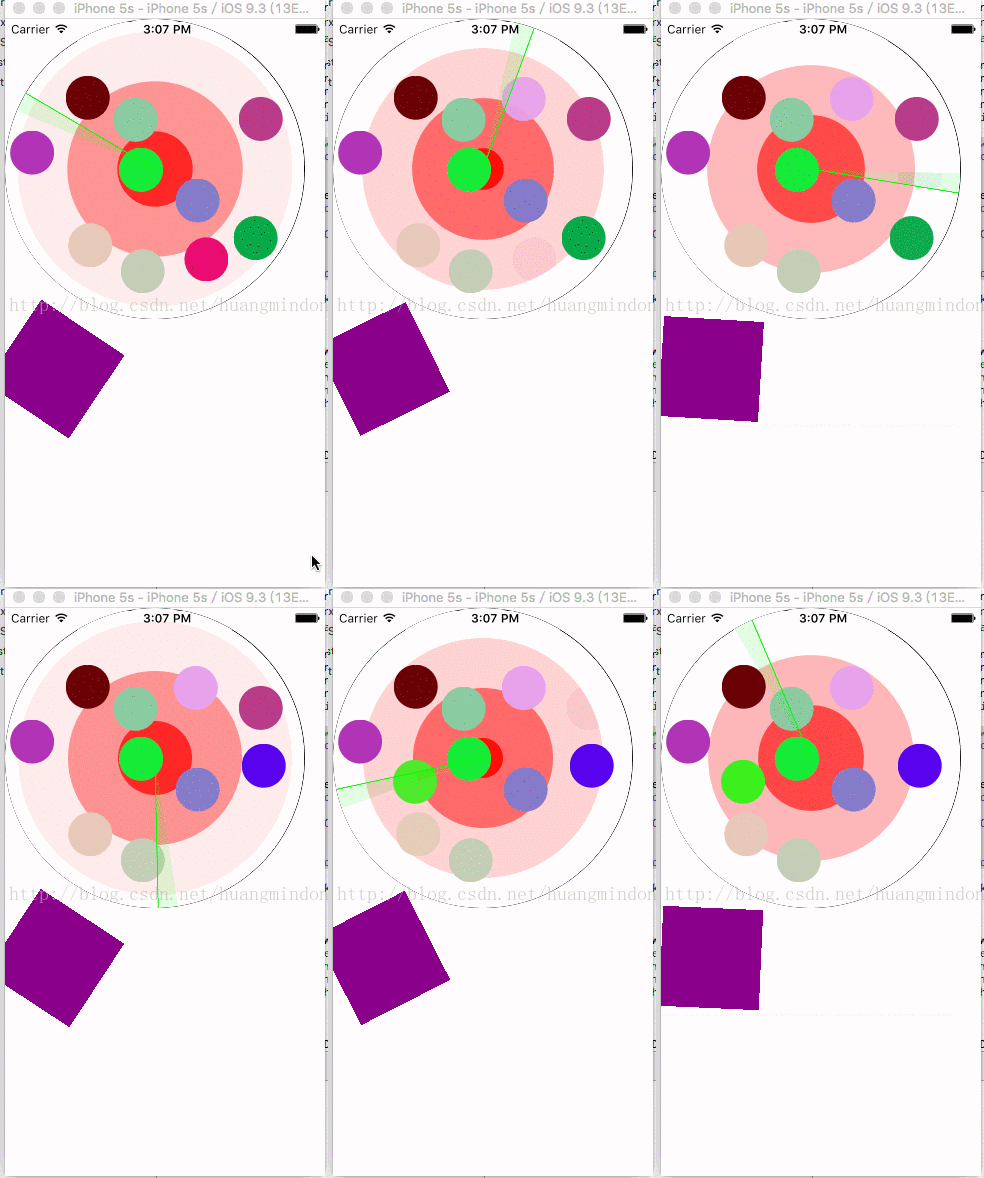
本文實例為大家分享了iOS實現雷達掃描的具體代碼,供大家參考,具體內容如下

|
1
2
3
4
5
6
7
8
9
10
11
12
13
14
15
16
17
18
19
20
|
#import <UIKit/UIKit.h> @interface LTIndicatiorView : UIView@property(nonatomic,strong)UIColor *color;@property(nonatomic,assign)float repeatCount;@property(nonatomic,strong)UIColor *borderColor;@property(nonatomic,assign)float borderWidth;@end @interface LTRadarView : UIView@property(nonatomic,strong)UIColor *color;@property(nonatomic,strong)UIColor *borderColor;@property(nonatomic,assign)float borderWidth;@property(nonatomic,assign)int pulsingCount;@property(nonatomic,assign)float duration;@property(nonatomic,assign)float repeatCount;@property(nonatomic,strong)CALayer *pulsingLayer; @end |
.m文件
|
1
2
3
4
5
6
7
8
9
10
11
12
13
14
15
16
17
18
19
20
21
22
23
24
25
26
27
28
29
30
31
32
33
34
35
36
37
38
39
40
41
42
43
44
45
46
47
48
49
50
51
52
53
54
55
56
57
58
59
60
61
62
63
64
65
66
67
68
69
70
71
72
73
74
75
76
77
78
79
80
81
82
83
84
85
86
87
88
89
90
91
92
93
94
95
96
97
98
99
100
101
102
103
104
105
106
107
108
109
110
111
112
113
114
115
116
117
118
119
120
121
122
123
124
125
126
127
128
129
130
131
132
133
134
135
136
137
138
139
140
141
142
143
144
145
146
147
148
149
150
151
152
153
154
155
156
157
158
159
160
161
162
163
164
165
166
167
168
169
170
171
172
173
174
175
176
177
178
179
180
181
182
183
184
185
186
187
188
189
190
191
192
193
194
195
196
197
198
199
200
201
202
203
204
205
206
207
208
209
210
211
212
213
214
215
216
217
218
219
220
221
222
223
224
225
226
227
228
229
230
231
232
233
234
235
236
237
238
239
240
241
242
243
244
245
246
247
248
249
250
251
252
253
254
255
256
257
258
259
260
261
262
263
264
265
266
267
268
269
270
271
272
273
274
275
276
277
278
279
280
281
282
283
284
285
286
287
288
289
290
291
292
293
294
295
296
297
298
299
300
301
302
303
304
305
306
307
308
309
310
311
312
313
314
315
316
317
318
319
320
|
//// LTRadarView.m// raderScan//// Created by mac on 17/2/5.// Copyright © 2017年 mac. All rights reserved.// #import "LTRadarView.h" #define Angel 15 @interface LTRadarButton : UIButton @end @implementation LTRadarButton - (void)removeFromSuperview{ [UIView beginAnimations:@"" context:nil]; [UIView setAnimationDuration:0.5]; self.transform = CGAffineTransformMakeScale(0.2, 0.2); self.alpha = 0; [UIView setAnimationDidStopSelector:@selector(callSuperRemoveFromSuperview)]; [UIView commitAnimations]; } - (void)callSuperRemoveFromSuperview{ [super removeFromSuperview];} - (id)initWithFrame:(CGRect)frame{ self = [super initWithFrame:frame]; self.alpha = 0; return self;} - (void)didMoveToWindow{ [super didMoveToWindow]; self.transform = CGAffineTransformMakeScale(0.2, 0.2); if (self.window) { [UIView animateWithDuration:0.5 animations:^{ self.transform = CGAffineTransformIdentity; self.alpha = 1; }]; } } @end @implementation LTIndicatiorView - (id)initWithFrame:(CGRect)frame{ if (self = [super initWithFrame:frame]) { _color = [UIColor greenColor]; _repeatCount = HUGE_VALF; _borderColor = [UIColor redColor]; _borderWidth = 1.0f; } return self;} // Only override drawRect: if you perform custom drawing. // An empty implementation adversely affects performance during animation. - (void)drawRect:(CGRect)rect { // Drawing code self.backgroundColor = [UIColor whiteColor]; [super drawRect:rect]; self.layer.cornerRadius = self.frame.size.height/2.0f; self.clipsToBounds = YES; self.layer.borderColor = [UIColor clearColor].CGColor; self.layer.borderWidth = 50; self.layer.masksToBounds = YES; CGContextRef context = UIGraphicsGetCurrentContext(); for (int i = 0; i < Angel; i++) { CGFloat alpha = (float)i /(float)600; CGColorRef shadowColor = [[UIColor greenColor] colorWithAlphaComponent:alpha].CGColor;//計算扇形填充顏色 CGContextSetFillColorWithColor(context, shadowColor); CGContextMoveToPoint(context, self.center.x, self.center.y);//指定員心 CGFloat startAngle = (-Angel+i+1.15)/Angel*(float)M_PI; CGFloat endAngle = (-Angel+i-1.15)/Angel*(float)M_PI;// NSLog(@"startAngle = %f endAngle = %f ,alpha = %f",startAngle,endAngle,alpha); CGContextAddArc(context, self.center.x, self.center.y, self.frame.size.height/2.0f,0, 25, 1);//畫一個扇形 CGContextClosePath(context); CGContextDrawPath(context, kCGPathFill);//繪制扇形 } CGContextSetLineWidth(context, 1);//掃描線寬度 CGContextSetStrokeColorWithColor(context, [_color colorWithAlphaComponent:1].CGColor);//掃描線顏色 CGContextMoveToPoint(context, self.center.x, self.center.y); CGContextAddLineToPoint(context, self.frame.size.height, self.center.y); CGContextStrokePath(context); CGContextSetRGBStrokeColor(context,255/255.0, 255/255.0, 255/255.0, 0.1);//最外面圓顏色 CGContextSetLineWidth(context, 10);//線寬度 CGContextAddArc(context, self.center.x, self.center.y, self.frame.size.height/2.0, 0, 2*M_PI, 1);//添加一個圓 CGContextDrawPath(context, kCGPathStroke);//繪制路徑 CGContextStrokePath(context);//顯示繪制 //掃描動畫 CABasicAnimation *rotateAnimation = [CABasicAnimation animation]; rotateAnimation.keyPath = @"transform.rotation.z"; rotateAnimation.toValue = @(2*M_PI); rotateAnimation.duration = 3; rotateAnimation.removedOnCompletion = NO; rotateAnimation.repeatCount = _repeatCount; [self.layer addAnimation:rotateAnimation forKey:@"rotate_layer"]; } @end @implementation LTRadarView{ NSMutableArray *items;} - (id)initWithFrame:(CGRect)frame{ if (self = [super initWithFrame:frame]) { items = [NSMutableArray array]; _color = [UIColor redColor]; _borderColor = [UIColor greenColor]; _pulsingCount = 3; _duration = 3; _repeatCount = HUGE_VALF; _borderWidth = 3.0f; } return self;} // Only override drawRect: if you perform custom drawing.// An empty implementation adversely affects performance during animation.- (void)drawRect:(CGRect)rect { // Drawing code [super drawRect:rect]; self.layer.cornerRadius = self.frame.size.height/2; self.clipsToBounds = YES; self.layer.borderColor = [UIColor clearColor].CGColor; self.layer.borderColor = [UIColor clearColor].CGColor; self.layer.borderWidth = 50; self.layer.masksToBounds = YES; CGContextRef ctx = UIGraphicsGetCurrentContext(); CGContextSetRGBFillColor(ctx, 0/255.0, 0/255.0, 0/255.0, 1);//圓顏色 CGContextSetLineWidth(ctx, 1);//寬度 CGContextAddArc(ctx, self.center.x, self.center.y, self.frame.size.height/2, 0, 2*M_PI, 1);//添加一個圓 CGContextDrawPath(ctx, kCGPathStroke);//繪制 CGContextStrokePath(ctx);//顯示 CALayer *animationLayer = [CALayer layer]; animationLayer.frame = self.layer.frame; for (int i = 0; i < _pulsingCount; i++) { CALayer *pulsingLayer = [CALayer layer]; pulsingLayer.frame = CGRectMake(0, 0, rect.size.width, rect.size.height); pulsingLayer.borderColor = [UIColor clearColor].CGColor; pulsingLayer.borderWidth = 1; pulsingLayer.cornerRadius = rect.size.height/2; pulsingLayer.backgroundColor = [UIColor redColor].CGColor; CAAnimationGroup *animationGroup = [CAAnimationGroup animation]; animationGroup.fillMode = kCAFillModeBoth; animationGroup.beginTime = CACurrentMediaTime() + (float) i * _duration / _pulsingCount; animationGroup.duration = _duration; animationGroup.repeatCount = HUGE_VALF; animationGroup.timingFunction = [CAMediaTimingFunction functionWithName:kCAMediaTimingFunctionLinear]; animationGroup.autoreverses = NO; animationGroup.delegate = self; animationGroup.removedOnCompletion = NO; CABasicAnimation *scaleAnimation = [CABasicAnimation animation]; scaleAnimation.keyPath = @"transform.scale"; scaleAnimation.removedOnCompletion = NO; scaleAnimation.fromValue = @(0.0f); scaleAnimation.toValue = @1.0f; scaleAnimation.autoreverses = NO; CAKeyframeAnimation *opacityAnimation = [CAKeyframeAnimation animation]; opacityAnimation.keyPath = @"opacity"; opacityAnimation.values = @[@1.0,@0.75,@0.5,@0.25,@0.0]; opacityAnimation.keyTimes = @[@0.0,@0.25,@0.5,@0.75,@1]; opacityAnimation.autoreverses = NO; opacityAnimation.removedOnCompletion = NO; animationGroup.animations = @[scaleAnimation,opacityAnimation]; [pulsingLayer addAnimation:animationGroup forKey:@"pulsing"]; [animationLayer addSublayer:pulsingLayer]; } [self.layer addSublayer:animationLayer]; [NSTimer scheduledTimerWithTimeInterval:1 target:self selector:@selector(addOrReplaceItem) userInfo:nil repeats:YES];} - (void)animation:(CALayer *)layer{ CAAnimationGroup *animationGroup = [CAAnimationGroup animation]; animationGroup.fillMode = kCAFillModeBoth; animationGroup.beginTime = CACurrentMediaTime() + 1 * _duration / _pulsingCount; animationGroup.duration = _duration; animationGroup.repeatCount = HUGE_VALF; animationGroup.timingFunction = [CAMediaTimingFunction functionWithName:kCAMediaTimingFunctionLinear]; animationGroup.autoreverses = NO; animationGroup.delegate = self; animationGroup.removedOnCompletion = NO; CABasicAnimation *scaleAnimation = [CABasicAnimation animation]; scaleAnimation.keyPath = @"transform.scale"; scaleAnimation.removedOnCompletion = NO; scaleAnimation.fromValue = @(0.0f); scaleAnimation.toValue = @1.0f; scaleAnimation.autoreverses = NO; CAKeyframeAnimation *opacityAnimation = [CAKeyframeAnimation animation]; opacityAnimation.keyPath = @"opacity"; opacityAnimation.values = @[@1.0,@0.75,@0.5,@0.25,@0.0]; opacityAnimation.keyTimes = @[@0.0,@0.25,@0.5,@0.75,@1]; opacityAnimation.autoreverses = NO; opacityAnimation.removedOnCompletion = NO; animationGroup.animations = @[scaleAnimation,opacityAnimation]; [layer addAnimation:animationGroup forKey:@"pulsing"]; } #define RandomColor [UIColor colorWithRed:arc4random_uniform(256)/255.0 green:arc4random_uniform(256)/255.0 blue:arc4random_uniform(256)/255.0 alpha:1.0]/* 生成一個在圓里面的坐標 生成的坐標要圍繞中心的綠點(圓心),讓我們重新翻開數學課本,看看高中數學對三角函數的定義: 在一個平面直角坐標系中,以原點為圓心,1 為半徑畫一個圓,這個圓交 x 軸于 A 點。以 O 為旋轉中心,將 A 點逆時針旋轉一定的角度α至 B 點,設此時 B 點的坐標是(x,y),那么此時 y 的值就叫做α的正弦,記作 sinα;此時 x 的值就叫做α的余弦,記作 cosα;y 與 x 的比值 y/x 就叫做α的正切,記作 tanα。 任意角三角函數 正弦sinθ=y/r, 余弦cosθ=x/r,正切tanθ=y/x,余切cotθ=x/y,正割secθ=r/x,余割cscθ=r/y 銳角三角函數 正弦sinA=a/c, 余弦cosA=b/c,正切tanA=a/b,余切cotA=b/a,正割secA=c/b,余割cscA=c/a 還有一個很重要的公式:圓的參數方程:以點O(a,b)為圓心,以r為半徑的圓的參數方程是 x=a+r*cosθ, y=b+r*sinθ, (其中θ為參數) 到這里為止,思路就清晰了,以下是generateCenterPointInRadar的方法實現: */ - (CGPoint)generateCenterPointInRadar{ float angle = arc4random() % 360;//隨機一個角度 float radius = arc4random() % (int)((self.bounds.size.width - 44)/2);//隨機一個半徑, 這里減去44是因為要把這個view顯示在圓里面,如果不減44,則有可能會顯示在圓外面 double x = cos(angle) * radius;//計算隨機出現的一個角度的x坐標 x=a+r*cosθ r = radius, θ = angle ,a = 圓心的x坐標 double y = sin(angle) * radius;//計算隨機出現的一個角度的y坐標 y=b+r*sinθ r = radius, θ = angle ,b = 圓心的y坐標 return CGPointMake(x + self.bounds.size.width / 2, y + self.bounds.size.height / 2);//x y 分別加個圓心的坐標即self.center.x.y} - (void)addOrReplaceItem{ int maxCount = 10; LTRadarButton *radarButton = [LTRadarButton buttonWithType:UIButtonTypeCustom]; radarButton.frame = CGRectMake(0, 0, 44, 44); radarButton.backgroundColor = RandomColor; radarButton.layer.cornerRadius = 44/2; do { CGPoint center = [self generateCenterPointInRadar]; radarButton.center = CGPointMake(center.x, center.y); } while ([self itemFrameIntersectsInOtherItem:radarButton.frame]); [self addSubview:radarButton]; [items addObject:radarButton]; if (items.count > maxCount) { UIView * view = [items firstObject]; [view removeFromSuperview]; [items removeObject:view]; }} /* 我們現在在生成每個item的center的時候,沒有和已有的item進行比較,這是一個比較耗性能的操作,如果你的itemSize過大,maxCount過多,這甚至能導致死循環,如果是那樣的話,你可能在對itemSize以及maxCount做出限制的同時,也對循環的數量也進行控制,如果在生成一個item的center的時候,進行了過多的循環,就可以視為進入死循環了,在這種情況下,你只能重新計算已有的centers。這里不考慮這種極端情況,因為目前的itemSize和maxCount的配合,不會出現死循環。 我們添加一個itemFrameIntersectsInOtherItem私有方法來判斷是否和之前生成的center有了重疊: */- (BOOL)itemFrameIntersectsInOtherItem:(CGRect)frame{ for (UIView *item in items) { if (CGRectIntersectsRect(item.frame, frame)) { return YES; } } return NO;} |
以上就是本文的全部內容,希望對大家的學習有所幫助,也希望大家多多支持服務器之家。
原文鏈接:https://blog.csdn.net/huangmindong/article/details/54881163


