對 CSS 布局掌握程度決定你在Web開發中的開發頁面速度。隨著Web技術的不斷革新,實現各種布局的方式已經多得數不勝數了。
本篇文章總結了四十二種CSS的常見布局,這四十二種布局可以細分為如下幾類:
- 水平居中
- 垂直居中
- 水平垂直居中
- 兩列布局
- 三列布局
- 等分布局
- Sticky Footer布局
- 全屏布局
這些內容也正是本篇文章的目錄。
水平居中
實現水平布局比較簡單,方法也比較多,這里總結了7種常用的布局方法,其公共的CSS代碼如下所示:
.parent { background: #ff8787; } .child { height: 300px; width: 300px; background: #e599f7; }
其 HTML 結構也是固定的,就是一個父級,其寬度繼承了的寬度,還有一個子級,這里是固定的300px*300px,代碼如下:
<div class="parent">
  <div class="child">div>
div>
最終的實現效果如下:
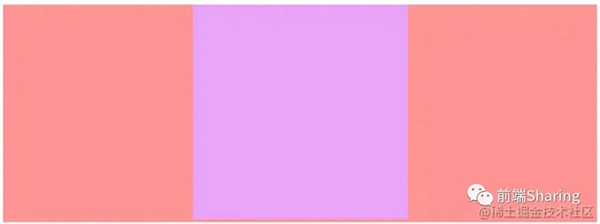
上圖中玫瑰色的塊是父級,隨頁面寬度增加的;淡紫色是子級,相對于父級居中的。
1. 使用text-align屬性
若元素為行內塊級元素,也就是 display: inline-block 的元素,可以通過為其父元素設置t ext-align: center 實現水平居中。實現的CSS代碼如下:
.parent { /* 對于子級為 display: inline-block; 可以通過 text-align: center; 實現水平居中 */ text-align: center;
} .child { display: inline-block;
}
2. 定寬塊級元素水平居中(方法一)
對于定寬的的塊級元素實現水平居中,最簡單的一種方式就是 margin: 0 auto;,但是值得注意的是一定需要設置寬度。實現 CSS 代碼如下:
.child { /* 對于定寬的子元素,直接 margin:0 auto; 即可實現水平居中 */ margin: 0 auto;
}
3. 定寬塊級元素水平居中(方法二)
對于開啟定位的元素,可以通過 left 屬性 和 margin 實現。實現CSS代碼如下:
.child { /* 開啟定位 */ position: relative; left: 50%; /* margin-left 為 負的寬度的一半 */ margin-left: -150px;
}
4. 定寬塊級元素水平居中(方法三)
當元素開啟決定定位或者固定定位時, left 屬性和 right 屬性一起設置就會拉伸元素的寬度,在配合 width 屬性與 margin 屬性就可以實現水平居中。
實現 CSS 代碼如下:
.parent { position: relative; height: 300px;
} .child { /* 開啟定位 父相子絕 */ position: absolute; /* 水平拉滿屏幕 */ left: 0; right: 0; width: 300px; /* 拉滿屏幕之后設置寬度,最后通過 margin 實現水平居中 */ margin: auto;
}
5. 定寬塊級元素水平居中(方法四)
當元素開啟決定定位或者固定定位時, left 屬性和 transform 屬性即可實現水平居中。
實現CSS代碼如下:
.parent { position: relative;
} .child { /* 開啟定位 */ position: absolute; /* 該方法類似于 left 于 -margin 的用法,但是該方法不需要手動計算寬度。 */ left: 50%; transform: translateX(-50%);
}
6. Flex方案
通過 Flex 可以有很多方式實現這個居中布局的效果。
實現 CSS 代碼如下
.parent { height: 300px; /* 開啟 Flex 布局 */ display: flex; /* 通過 justify-content 屬性實現居中 */ justify-content: center;
} .child { /* 或者 子元素 margin: auto*/ margin: auto;
}
7. Grid方案
通過Grid實現居中布局比通過Flex實現的方式更多一些。
實現CSS代碼如下:
.parent { height: 300px; /* 開啟 Grid 布局 */ display: grid; /* 方法一 */ justify-items: center; /* 方法二 */ justify-content: center;
} .child { /* 方法三 子元素 margin: auto*/ margin: auto;
}
以上就是水平居中布局常用的幾種方式。
垂直居中
實現垂直布局也是比較簡單的,方法也比較多,這里總結了6種常用的布局方法,其公共的 CSS 代碼如下所示:
.parent { height: 500px; width: 300px; margin: 0 auto; background-color: #ff8787;
} .child { width: 300px; height: 300px; background-color: #91a7ff;
}
其 HTML 結構也是固定的,就是一個父級包裹一個子級,這里的子級是固定的300px*300px,代碼如下:
<div class="parent">
  <div class="child">div>
div>
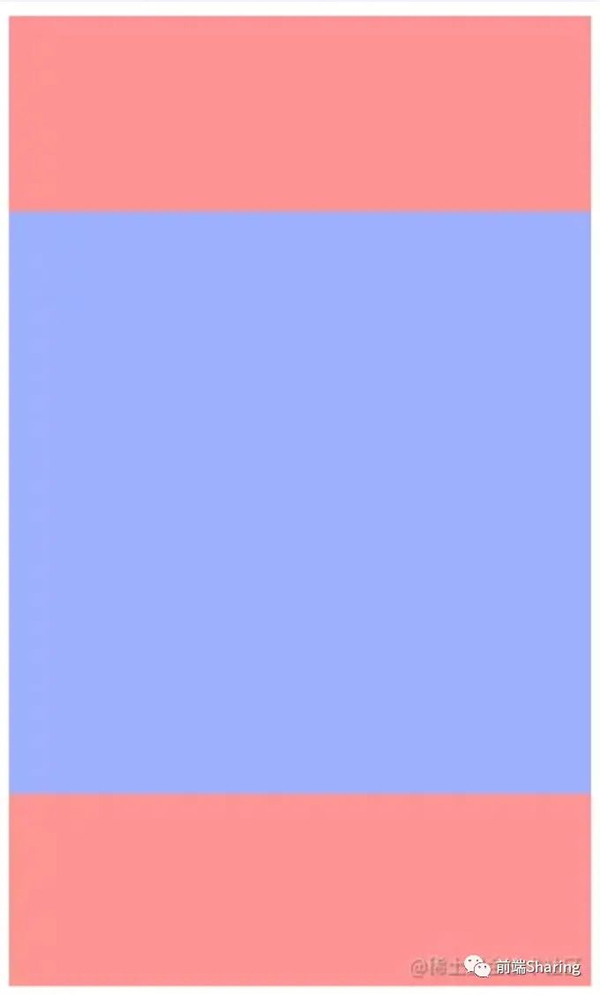
最終的實現效果如下:
1. 行內塊級元素垂直居中
若元素是行內塊級元素, 基本思想是子元素使用display: inline-block, vertical-align: middle;并讓父元素行高等同于高度。
實現CSS代碼如下:
.parent { /* 為父級容器設置行高 */ line-height: 500px;
} .child { /* 將子級元素設置為 inline-block 元素 */ display: inline-block; /* 通過 vertical-align: middle; 實現居中 */ vertical-align: middle;
}
2. 定位方式實現(方法一)
第一種通過定位的方式實現就比較簡單,實際就是通過top: 50%; margin-top: 等于負的高度的一半就可以實現垂直居中。
實現CSS代碼如下:
.parent { /* 為父級容器開啟相對定位 */ position: relative;
} .child { position: absolute; top: 50%; /* margin-top: 等于負高度的一半 */ margin-top: -150px;
}
3. 定位方式實現(方法二)
第二種通過定位的方式實現實現思路:top 和 bottom 將子元素拉伸至100%,設置指定的高度,通過margin:auto;即可實現垂直居中。
實現CSS代碼如下:
.parent { /* 為父級容器開啟相對定位 */ position: relative;
} .child { height: 300px; position: absolute; /* 垂直拉滿 */ top: 0; bottom: 0; /* margin: auto 即可實現 */ margin: auto;
}
4. 定位方式實現(方法三)
第三種通過定位的方式就比較靈活,適用于多種場合,使用 top 配合 tansform 即可。
實現CSS代碼如下:
.parent { /* 為父級容器開啟相對定位 */ position: relative;
} .child { position: absolute; top: 50%; transform: translateY(-50%);
}
5. Flex方案
通過 Flex 可以有很多方式實現這個垂直居中布局的效果。
實現CSS代碼如下:
.parent { /* 開啟 flex 布局 */ display: flex; /* 方法一 */ /* align-items: center; */ } .child { /* 方法二 */ margin: auto;
}
通過 Flex 布局實現不僅僅只有上面兩種,這里只介紹最簡單的方式。
6. Grid方案
通過 Grid 實現居中布局比通過 Flex 實現的方式更多一些。
實現CSS代碼如下:
.parent { display: grid; /* 方法一 */ /* align-items: center; */ /* 方法二 */ /* align-content: center; */ } .child { /* 方法三 */ /* margin: auto; */ /* 方法四 */ align-self: center;
}
以上就是垂直居中布局常用的幾種方式。
水平垂直居中
實現水平垂直布局基本就是將上面幾種方式結合使用,這里總結了7種常用的布局方法,其公共的 CSS 代碼如下所示:
body { margin: 0;
} .parent { height: 500px; width: 500px; background-color: #eebefa; margin: 0 auto;
} .child { height: 300px; width: 300px; background-color: #f783ac;
}
其 HTML 結構也是固定的,就是一個父級包裹一個子級,這里的子級是固定的300px*300px,代碼如下:
<div class="parent">
  <div class="child">div>
div>
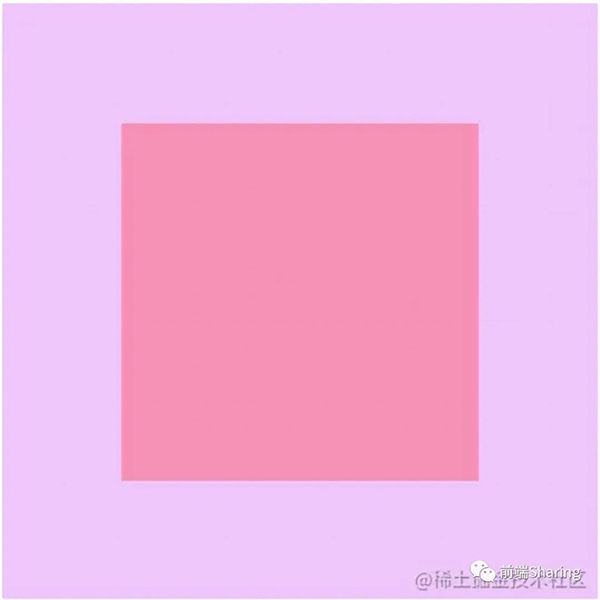
最終的實現效果如下:
1. 行內塊級水平垂直居中方案
步驟如下:
- 容器元素行高等于容器高度
- 通過 text-align: center; 實現水平居中
- 將子級元素設置為水平塊級元素
- 通過 vertical-align: middle; 實現垂直居中
實現CSS代碼如下:
.parent { /* 1. 設置行高等于容器高度 */ line-height: 500px; /* 通過 text-align: center; 實現水平居中 */ text-align: center;
} .child { /* 將子級元素設置為水平塊級元素 */ display: inline-block; /* 通過 vertical-align: middle; 實現垂直居中 */ vertical-align: middle;
}
2. 定位實現水平垂直居中方案(一)
步驟如下:
- 使子元素相對于容器元素定位
- 子元素開啟絕對定位
- 設置該元素的偏移量,值為50% 減去寬度/高度的一半
實現CSS代碼如下:
.parent { /* 1. 使子元素相對于本元素定位 */ position: relative;
} .child { /* 2. 開啟絕對定位 */ position: absolute; /* 3. 設置該元素的偏移量,值為 50%減去寬度/高度的一半 */ left: calc(50% - 150px); top: calc(50% - 150px);
}
3. 定位實現水平垂直居中方案(二)
步驟如下:
- 使子元素相對于容器元素定位
- 子元素開啟絕對定位
- 設置該元素的偏移量,值為50%
- 通過外邊距-值的方式將元素移動回去
實現CSS代碼如下:
.parent { /* 1. 使子元素相對于本元素定位 */ position: relative;
} .child { /* 2. 開啟絕對定位 */ position: absolute; /* 3. 設置該元素的偏移量,值為 50% */ left: 50%; top: 50%; margin-left: -150px; margin-top: -150px;
}
4. 定位實現水平垂直居中方案(三)
步驟如下:
- 使子元素相對于容器元素定位
- 子元素開啟絕對定位
- 將子元素拉滿整個容器
- 通過margin:auto實現水平垂直居中
實現CSS代碼如下:
.parent { /* 1. 使子元素相對于本元素定位 */ position: relative;
} .child { /* 2. 開啟絕對定位 */ position: absolute; /* 3. 將子元素拉滿整個容器 */ top: 0; left: 0; right: 0; bottom: 0; /* 4. 通過 margin:auto 實現水平垂直居中 */ margin: auto;
}
5. 定位實現水平垂直居中方案(四)
步驟如下:
- 使子元素相對于容器元素定位
- 子元素開啟絕對定位
- 設置該元素的偏移量,值為50%
- 通過 translate 反向偏移的方式,實現居中
實現 CSS 代碼如下:
.parent { /* 1. 使子元素相對于本元素定位 */ position: relative;
} .child { /* 2. 開啟絕對定位 */ position: absolute; /* 3. 設置該元素的偏移量,值為 50%*/ left: 50%; top: 50%; /* 通過translate反向偏移的方式,實現居中 */ transform: translate(-50%, -50%);
}
6. Flex方案
步驟如下:
- 將元素設置為 Flex 布局
- 通過 justify-content: center 以及 align-items: center 實現或者 margin: auto; 實現。
實現CSS代碼如下:
.parent { /* 1. 將元素設置為 Flex 布局 */ display: flex; /* 2. 通過 justify-content 以及 align-items: center 實現 */ /* justify-content: center;  align-items: center; */ } .child { /* 或者通過 margin auto 實現 */ margin: auto;
}
7. Grid方案
Grid 方案的實現方式相對來說比較簡單,方式也較多。
實現CSS代碼如下:
.parent { /* 1. 元素設置為Grid 元素 */ display: grid; /* 通過 items 屬性實現*/ /* align-items: center; */ /* justify-items: center; */ /* items 的縮寫 */ /* place-items: center; */ /* 或者通過 content 屬性 */ /* align-content: center; */ /* justify-content: center; */ /* content 的縮寫 */ /* place-content: center; */ } .child { /* 或者通過 margin auto 實現 */ /* margin: auto; */ /* 或者通過 self 屬性 */ /* align-self: center;  justify-self: center; */ /* self 的縮寫 */ place-self: center;
}
實現水平垂直居中布局的方式大多是通過上面兩種布局的方式相結合。
兩列布局
所謂的兩列布局就是一列定寬(也有可能由子元素決定寬度),一列自適應的布局。最終效果如下所示:
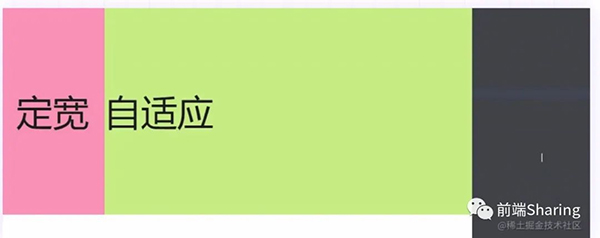
這里用到的 HTML 結構如下:
<!-- 解決高度塌陷 -->
<div class="container clearfix">
  <div class="left">定寬div>
  <div class="right">自適應div>
div>
公共的 CSS 代碼如下:
body { margin: 0;
} .container { height: 400px; background-color: #eebefa;
} .left { height: 400px; width: 200px; background-color: #f783ac; font-size: 70px; line-height: 400px; text-align: center;
} .right { height: 400px; background-color: #c0eb75; font-size: 70px; line-height: 400px;
} /* 清除浮動 */ .clearfix:after { content: ''; display: block; height: 0; clear: both; visibility: hidden;
}
1. float+calc()函數完成左列定寬右列自適應
步驟如下:
- 左邊列開啟浮動
- 右邊列開啟浮動
- 右邊列寬度為父級 100%減去左列的寬度
實現CSS代碼如下:
.left { /* 左邊列開啟浮動 */ float: left;
} .right { /* 右邊列開啟浮動 */ float: left; /* 寬度減去左列的寬度 */ width: calc(100% - 200px);
}
2. float+margin-left完成左列定寬右列自適應
步驟如下:
- 左邊列開啟浮動
- 通過外邊距的方式使該容器的左邊有左邊列容器的寬度的外邊距
實現CSS代碼如下:
.left { /* 左邊列開啟浮動 */ float: left;
} .right { /* 通過外邊距的方式使該容器的左邊有200px */ margin-left: 200px;
}
3. absolute+margin-left完成左列定寬右列自適應
步驟如下:
- 開啟定位脫離文檔流
- 通過外邊距的方式使該容器的左邊有左邊列容器的寬度的外邊距
實現CSS代碼如下:
.left { /* 開啟定位脫離文檔流 */ position: absolute;
} .right { /* 通過外邊距的方式使該容器的左邊有200px */ margin-left: 200px;
}
值得注意的是 以上幾種方案左邊列必須定寬,才可以實現,下面這幾種方案左邊列可以由子級撐起。
4. float+overflow完成左列定寬右列自適應
步驟如下:
- 左側元素開始浮動
- 右側自適應元素設置overflow會創建一個BFC完成自適應
實現CSS代碼如下:
.left { /* 1. 左側元素開始浮動 */ float: left;
} .right { /* 2. 右側自適應元素設置 overflow 會創建一個BFC 完成自適應 */ overflow: hidden;
}
5. Flex方案
通過Flex布局實現該功能主要是通過 flex 屬性來實現示例代碼如下:
.container { display: flex;
} .right { flex: 1; /* flex: 1; 表示 flex-grow: 1; 即該項占所有剩余空間 */ }
6. Grid方案
通過 Grid 布局實現該功能主要是通過template屬性實現,具體代碼如下所示:
.container { display: grid; /* 將其劃分為兩行,其中一列有本身寬度決定, 一列占剩余寬度*/ grid-template-columns: auto 1fr;
}
三列布局
三列布局主要分為兩種:
- 第一種是前兩列定寬,最后一列自適應,這一種本質上與兩列布局沒有什么區別,可以參照兩列布局實現。
- 第二種是前后兩列定寬,中間自適應,最終效果圖如下

公共 CSS 如下:
body { margin: 0;
} .container { height: 400px; background-color: #eebefa;
} .left { height: 400px; width: 200px; background-color: #f783ac;
} .content { height: 400px; background-color: #d9480f;
} .right { height: 400px; width: 200px; background-color: #c0eb75;
} .left, .content, .right { font-size: 70px; line-height: 400px; text-align: center;
} /* 清除浮動 */ .clearfix:after { content: ''; display: block; height: 0; clear: both; visibility: hidden;
}
HTML 結構如下:
<!-- 解決高度塌陷 -->
<div class="container clearfix">
  <div class="left">左div>
  <div class="content">內容div>
  <div class="right">右div>
div>
1. 通過float實現(一)
實現步驟:
- 為了完成效果需要調整HTML結構,調整后如下:
<!-- 解決高度塌陷 -->
<div class="container clearfix">
  <div class="left">左div>
  <div class="right">右div>
  <div class="content">內容div>
div>
- 左列容器開啟左浮動
- 右列容器開啟右浮動
- 自適應元素設置overflow會創建一個BFC完成自適應
實現CSS代碼如下
.left { /* 1. 左列容器開啟左浮動 */ float: left;
} .content { /* 自適應元素設置 overflow 會創建一個BFC 完成自適應 */ overflow: hidden;
} .right { /* 2. 右列容器開啟右浮動 */ float: right;
}
2. 通過float實現(二)
實現步驟:
- 為了完成效果需要調整 HTML 結構,調整后如下:
<!-- 解決高度塌陷 -->
<div class="container clearfix">
  <div class="left">左div>
  <div class="right">右div>
  <div class="content">內容div>
div>
- 左列容器開啟左浮動
- 右列容器開啟右浮動
- 使中間自適應的寬度為父級容器減去兩個定寬的列
實現CSS代碼如下:
.left { /* 1. 左列容器開啟左浮動 */ float: left;
} .content { /* 3. 使中間自適應的寬度為父級容器減去兩個定寬的列 */ width: calc(100%-400px);
} .right { /* 2. 右列容器開啟右浮動 */ float: right;
}
3. 通過position實現
實現步驟
- 左右兩列脫離文檔流,并通過偏移的方式到達自己的區域
- 使中間自適應的寬度為父級容器減去兩個定寬的列
- 通過外邊距將容器往內縮小
實現CSS代碼如下:
.left { /* 1. 左右兩列脫離文檔流,并通過偏移的方式到達自己的區域 */ position: absolute; left: 0; top: 0;
} .content { /* 2. 使中間自適應的寬度為父級容器減去兩個定寬的列 */ width: calc(100%-400px); /* 3. 通過外邊距將容器往內縮小 */ margin-right: 200px; margin-left: 200px;
} .right { position: absolute; right: 0; top: 0;
}
4. Flex方案
通過 Flex 布局實現該功能主要是通過 flex 屬性來實現。
實現CSS代碼如下:
.container { display: flex;
} .right { flex: 1; /* flex: 1; 表示 flex-grow: 1; 即該項占所有剩余空間 */ }
5. Grid方案
通過 Grid 布局實現該功能主要是通過 template 屬性實現。
實現CSS代碼如下:
.container { display: grid; /* 將其劃分為兩行,其中一列有本身寬度決定, 一列占剩余寬度*/ grid-template-columns: auto 1fr auto;
}
等分布局
等分布局就是將一個容器平均分成幾等份,這里以 4 等分為例,主要介紹4種方法。
公共CSS部分如下:
body { margin: 0;
} .container { height: 400px; background-color: #eebefa;
} .item { height: 100%;
} .item1 { background-color: #eccc68;
} .item2 { background-color: #a6c1fa;
} .item3 { background-color: #fa7d90;
} .item4 { background-color: #b0ff70;
} /* 清除浮動 */ .clearfix:after { content: ''; display: block; height: 0; clear: both; visibility: hidden;
}
公共HTML代碼如下:
<!-- 父元素清除浮動 -->
<div class="container clearfix">
  <div class="item item1">div>
  <div class="item item2">div>
  <div class="item item3">div>
  <div class="item item4">div>
div>
最終的效果如下圖所示:
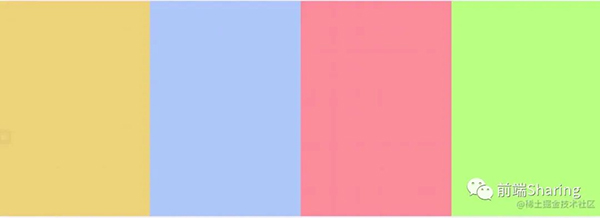
1. 浮動+百分比方式
這種方式比較簡單,開啟浮動,使每個元素占25%的寬度。
實現CSS代碼如下:
.item { /* 開啟浮動,每個元素占 25% 的寬度 */ width: 25%; float: left;
}
2. 行內塊級+百分比方式
這種方式與上面那種方式類似,不過需要注意的是行內塊級元素有一些類似于邊距的幾個像素,導致各25%會超出容器。
實現CSS代碼如下:
.item { /* 設置每個元素為行內塊級元素,每個元素占 24.5% 的寬度 */ width: 24.5%; /* 因為行內塊級元素有一些類似于邊距的幾個像素,導致各占25會超出容器 */ display: inline-block;
}
3. Flex方案
通過 Flex 布局實現該功能主要是通過 flex 屬性來實現。
實現CSS代碼如下:
.container { /* 開啟 flex 布局 */ display: flex;
} .item { /* 每個元素占相同的寬度 */ flex: 1;
}
4. Grid方案
通過 Grid 布局實現該功能主要是通過 template 屬性實現。
實現CSS代碼如下
.container { /* 開啟 grid 布局 */ display: grid; grid-template-columns: repeat(4, 1fr); /* 使用 repeat 函數生成如下代碼 */ /* grid-template-columns: 1fr 1fr 1fr 1fr; */ }
Sticky Footer布局
所謂的 Sticky Footer 布局并不是一種新的前端技術和概念,它就是一種網頁布局。如果頁面內容不夠長時,底部欄就會固定到瀏覽器的底部;如果足夠長時,底部欄就后跟隨在內容的后面。如下圖所示:
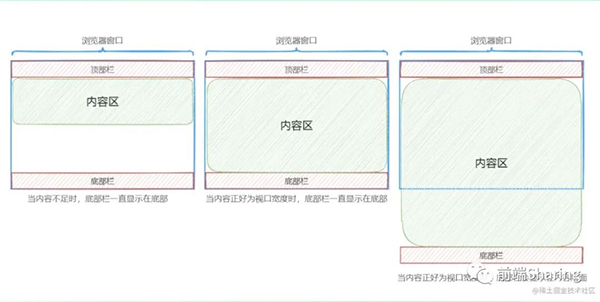
這里來介紹實現該布局的4種方式
公共的CSS代碼如下:
body { margin: 0;
} .container { height: 400px; display: flex;
} .left { height: 400px; width: 200px; background-color: #f759ab;
} .content { height: 400px; background-color: #52c41a; flex: 1;
} .right { height: 400px; width: 200px; background-color: #f759ab;
} .left, .content, .right { font-size: 70px; line-height: 400px; text-align: center;
} .header { height: 100px; background-color: #70a1ff;
} .footer { height: 100px; background-color: #ff7a45;
} .header, .footer { line-height: 100px; font-size: 52px; text-align: center;
}
公共的HTML如下:
<div class="main">
    <div class="header">headerdiv>
    <div class="container">
        <div class="left">leftdiv>
        <div class="content">contentdiv>
        <div class="right">rightdiv>
    div>
    <div class="footer">footerdiv>
div>
1. 絕對定位的方式
通過絕對定位的方式實現Sticky Footer布局的步驟如下:
- 設置最外層容器高度為100%;
- 讓子元素元素相對于容器元素進行定位,并設置容器元素最小高度為100%;
- 在中間區域設置padding-bottom為footer的高度 ;
- 底部欄絕對定位,并一直吸附在底部即可實現。
實現CSS代碼如下:
/* 1. 設置最外層容器為100% */ html, body { height: 100%;
} /* 2. 讓子元素元素相對于容器元素進行定位,并設置容器元素最小高度為100% */ .main { position: relative; min-height: 100%;
} /* 3. 在中間區域設置 padding-bottom 為footer 的高度 */ .container { padding-bottom: 100px;
} /* 由于開啟了絕對定位,寬度成了自適應,設置為100% bottom:0 始終保持底部 */ .footer { position: absolute; width: 100%; bottom: 0;
}
2. 使用calc函數實現
使用 calc 函數實現的方式會比較簡單,中間的容器最少高度為視口寬度的100% - 頭部和底部兩部分的高度即可完成該功能。
實現CSS代碼如下:
.container { /* 這里的 中間 部分的容器最少為視口寬度的 100% - 頭部和底部兩部分的高度即可完成該功能 */ min-height: calc(100vh - 200px);
}
3. Flex方案
實現步驟如下
- 開啟 flex 布局
- 將子元素布局方向修改為垂直排列
- 設置最小高度為當前視口,使不管中間部分有多高,始終都可以保持在底部
- 設置中間部分容器高度為自適應
實現CSS代碼如下:
.main { /* 開啟flex布局 */ display: flex; /* 將子元素布局方向修改為垂直排列 */ flex-flow: column; /* 設置最小高度為當前視口,使不管中間部分有多高,始終都可以保持在底部 */ min-height: 100vh;
} .container { /* 設置 中間 部分自適應 */ flex: 1;
}
4. Grid方案
實現步驟如下
- 開啟 grid 布局
- 置最小高度為當前視口,使不管中間部分有多高,始終都可以保持在底部
實現CSS代碼如下:
.main { /* 開啟grid布局 */ display: grid; grid-template-rows: auto 1fr auto; /* 設置最小高度為當前視口,使不管中間部分有多高,始終都可以保持在底部 */ min-height: 100vh;
}
全屏布局
全部布局主要應用在后臺,主要效果如下所示:
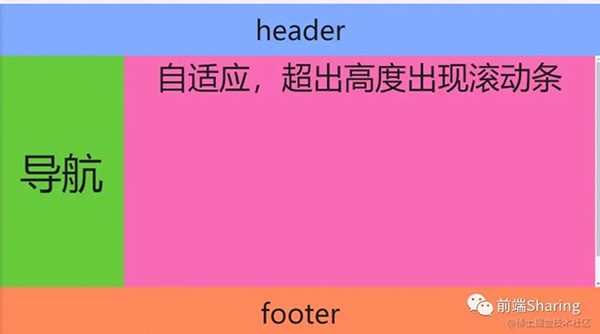
這里介紹三種全屏布局的實現方法。
公共的CSS代碼如下:
body { margin: 0;
} body, html, .container { height: 100vh; box-sizing: border-box; text-align: center; overflow: hidden;
} .content { background-color: #52c41a; /* * 中間部門的布局可以參考 兩列 三列 布局 */ display: grid; grid-template-columns: auto 1fr;
} .left { width: 240px; background-color: #52c41a; font-size: 80px; line-height: calc(100vh - 200px);
} .right { background-color: #f759ab; font-size: 60px;
} .header { height: 100px; background-color: #70a1ff;
} .footer { height: 100px; background-color: #ff7a45;
} .header, .footer { line-height: 100px; font-size: 52px;
}
HTML結構如下:
<div class="container">
    <div class="header">headerdiv>
    <div class="content">
        <div class="left">導航div>
        <div class="right">
            <div class="right-in">自適應,超出高度出現滾動條div>
        div>
    div>
    <div class="footer">footerdiv>
div>
1. 使用calc函數實現
實現步驟如下:
- 通過 calc 函數計算出中間容器的高度。
- 中間出現滾動條的容器設置overflow: auto即出現滾動條的時候出現滾動條。
實現CSS代碼如下:
.content { overflow: hidden; /* 通過 calc 計算容器的高度 */ height: calc(100vh - 200px);
} .left { height: 100%;
} .right { /* 如果超出出現滾動條 */ overflow: auto; height: 100%;
} .right-in { /* 假設容器內有500px的元素 */ height: 500px;
}
2. Flex 方案
使用 Flex 方式實現該布局比較簡單。
實現CSS代碼如下
.container { /* 開啟flex布局 */ display: flex; /* 將子元素布局方向修改為垂直排列 */ flex-flow: column;
} .content { /* 如果超出出現滾動條 */ overflow: auto; /* 設置 中間 部分自適應 */ flex: 1;
} .right-in { /* 假設容器內有500px的元素 */ height: 500px;
}
3. Grid 方案
grid布局對于這種布局來說,實現起來是非常得心應手的,通過template屬性即可實現。
實現CSS代碼如下
.container { /* 開啟grid布局 */ display: grid; grid-template-rows: auto 1fr auto;
} .content { /* 如果超出出現滾動條 */ overflow: auto;
} .right-in { /* 假設容器內有500px的元素 */ height: 500px;
}
原文地址:https://mp.weixin.qq.com/s/6pNcDBDqZzOJP46V6eZJeg


