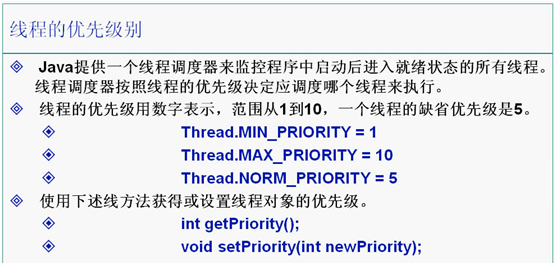
一、線程的優先級別

線程優先級別的使用范例:
|
1
2
3
4
5
6
7
8
9
10
11
12
13
14
15
16
17
18
19
20
21
22
23
24
25
26
27
28
29
30
31
32
33
34
35
36
37
|
package cn.galc.test;public class TestThread6 { public static void main(String args[]) { MyThread4 t4 = new MyThread4(); MyThread5 t5 = new MyThread5(); Thread t1 = new Thread(t4); Thread t2 = new Thread(t5); t1.setPriority(Thread.NORM_PRIORITY + 3);// 使用setPriority()方法設置線程的優先級別,這里把t1線程的優先級別進行設置 /* * 把線程t1的優先級(priority)在正常優先級(NORM_PRIORITY)的基礎上再提高3級 * 這樣t1的執行一次的時間就會比t2的多很多 * 默認情況下NORM_PRIORITY的值為5 */ t1.start(); t2.start(); System.out.println("t1線程的優先級是:" + t1.getPriority()); // 使用getPriority()方法取得線程的優先級別,打印出t1的優先級別為8 }}class MyThread4 implements Runnable { public void run() { for (int i = 0; i <= 1000; i++) { System.out.println("T1:" + i); } }}class MyThread5 implements Runnable { public void run() { for (int i = 0; i <= 1000; i++) { System.out.println("===============T2:" + i); } }} run()方法一結束,線程也就結束了。 |
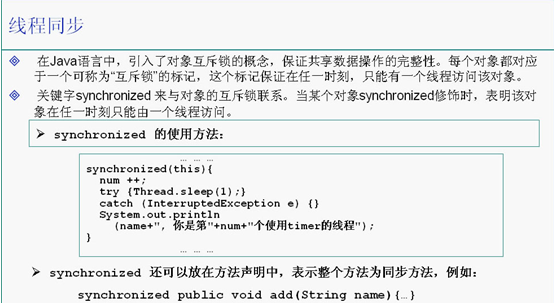
二、線程同步

synchronized關鍵字的使用范例:
|
1
2
3
4
5
6
7
8
9
10
11
12
13
14
15
16
17
18
19
20
21
22
23
24
25
26
27
28
29
30
31
32
33
34
35
36
37
38
|
package cn.galc.test;public class TestSync implements Runnable { Timer timer = new Timer(); public static void main(String args[]) { TestSync test = new TestSync(); Thread t1 = new Thread(test); Thread t2 = new Thread(test); t1.setName("t1");// 設置t1線程的名字 t2.setName("t2");// 設置t2線程的名字 t1.start(); t2.start(); } public void run() { timer.add(Thread.currentThread().getName()); }}class Timer { private static int num = 0; public/* synchronized */void add(String name) {// 在聲明方法時加入synchronized時表示在執行這個方法的過程之中當前對象被鎖定 synchronized (this) { /* * 使用synchronized(this)來鎖定當前對象,這樣就不會再出現兩個不同的線程同時訪問同一個對象資源的問題了 只有當一個線程訪問結束后才會輪到下一個線程來訪問 */ num++; try { Thread.sleep(1); } catch (InterruptedException e) { e.printStackTrace(); } System.out.println(name + ":你是第" + num + "個使用timer的線程"); } }} |
線程死鎖的問題:
|
1
2
3
4
5
6
7
8
9
10
11
12
13
14
15
16
17
18
19
20
21
22
23
24
25
26
27
28
29
30
31
32
33
34
35
36
37
38
39
40
41
42
43
44
45
46
47
48
49
50
51
52
53
54
55
56
57
58
59
60
61
62
63
64
65
66
67
68
69
70
71
72
|
package cn.galc.test;/*這個小程序模擬的是線程死鎖的問題*/public class TestDeadLock implements Runnable { public int flag = 1; static Object o1 = new Object(), o2 = new Object(); public void run() { System.out.println(Thread.currentThread().getName() + "的flag=" + flag); /* * 運行程序后發現程序執行到這里打印出flag以后就再也不往下執行后面的if語句了 * 程序也就死在了這里,既不往下執行也不退出 */ /* 這是flag=1這個線程 */ if (flag == 1) { synchronized (o1) { /* 使用synchronized關鍵字把對象01鎖定了 */ try { Thread.sleep(500); } catch (InterruptedException e) { e.printStackTrace(); } synchronized (o2) { /* * 前面已經鎖住了對象o1,只要再能鎖住o2,那么就能執行打印出1的操作了 * 可是這里無法鎖定對象o2,因為在另外一個flag=0這個線程里面已經把對象o1給鎖住了 * 盡管鎖住o2這個對象的線程會每隔500毫秒睡眠一次,可是在睡眠的時候仍然是鎖住o2不放的 */ System.out.println("1"); } } } /* * 這里的兩個if語句都將無法執行,因為已經造成了線程死鎖的問題 * flag=1這個線程在等待flag=0這個線程把對象o2的鎖解開, * 而flag=0這個線程也在等待flag=1這個線程把對象o1的鎖解開 * 然而這兩個線程都不愿意解開鎖住的對象,所以就造成了線程死鎖的問題 */ /* 這是flag=0這個線程 */ if (flag == 0) { synchronized (o2) { /* 這里先使用synchronized鎖住對象o2 */ try { Thread.sleep(500); } catch (InterruptedException e) { e.printStackTrace(); } synchronized (o1) { /* * 前面已經鎖住了對象o2,只要再能鎖住o1,那么就能執行打印出0的操作了 可是這里無法鎖定對象o1,因為在另外一個flag=1這個線程里面已經把對象o1給鎖住了 盡管鎖住o1這個對象的線程會每隔500毫秒睡眠一次,可是在睡眠的時候仍然是鎖住o1不放的 */ System.out.println("0"); } } } } public static void main(String args[]) { TestDeadLock td1 = new TestDeadLock(); TestDeadLock td2 = new TestDeadLock(); td1.flag = 1; td2.flag = 0; Thread t1 = new Thread(td1); Thread t2 = new Thread(td2); t1.setName("線程td1"); t2.setName("線程td2"); t1.start(); t2.start(); }} |
解決線程死鎖的問題最好只鎖定一個對象,不要同時鎖定兩個對象
生產者消費者問題:
|
1
2
3
4
5
6
7
8
9
10
11
12
13
14
15
16
17
18
19
20
21
22
23
24
25
26
27
28
29
30
31
32
33
34
35
36
37
38
39
40
41
42
43
44
45
46
47
48
49
50
51
52
53
54
55
56
57
58
59
60
61
62
63
64
65
66
67
68
69
70
71
72
73
74
75
76
77
78
79
80
81
82
83
84
85
|
package cn.galc.test;/* 范例名稱:生產者--消費者問題 * 源文件名稱:ProducerConsumer.java * 要 點: * 1. 共享數據的不一致性/臨界資源的保護 * 2. Java對象鎖的概念 * 3. synchronized關鍵字/wait()及notify()方法 */public class ProducerConsumer { public static void main(String args[]){ SyncStack stack = new SyncStack(); Runnable p=new Producer(stack); Runnable c = new Consumer(stack); Thread p1 = new Thread(p); Thread c1 = new Thread(c); p1.start(); c1.start(); }}class SyncStack{ //支持多線程同步操作的堆棧的實現 private int index = 0; private char []data = new char[6]; public synchronized void push(char c){ if(index == data.length){ try{ this.wait(); }catch(InterruptedException e){} } this.notify(); data[index] = c; index++; } public synchronized char pop(){ if(index ==0){ try{ this.wait(); }catch(InterruptedException e){} } this.notify(); index--; return data[index]; }}class Producer implements Runnable{ SyncStack stack; public Producer(SyncStack s){ stack = s; } public void run(){ for(int i=0; i<20; i++){ char c =(char)(Math.random()*26+'A'); stack.push(c); System.out.println("produced:"+c); try{ Thread.sleep((int)(Math.random()*1000)); }catch(InterruptedException e){ } } }}class Consumer implements Runnable{ SyncStack stack; public Consumer(SyncStack s){ stack = s; } public void run(){ for(int i=0;i<20;i++){ char c = stack.pop(); System.out.println("消費:"+c); try{ Thread.sleep((int)(Math.random()*1000)); }catch(InterruptedException e){ } } }} |
以上就是關于java線程的全部內容介紹,大家可以結合第一篇《java必學必會之線程(1)》進行學習,希望可以幫助到大家。


