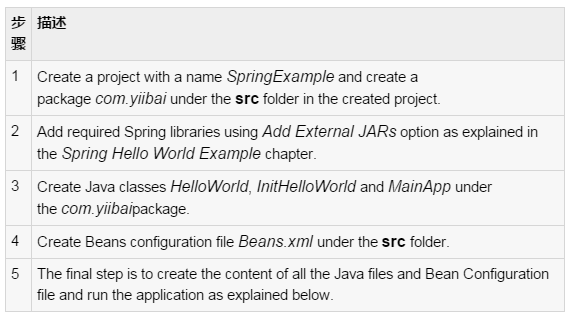
BeanPostProcessor 的接口定義,可以實(shí)現(xiàn)提供自己的實(shí)例化邏輯,依賴解析邏輯等,也可以以后在Spring容器實(shí)例化完畢,配置和初始化一個(gè)bean通過插入一個(gè)或多個(gè)的BeanPostProcessor實(shí)現(xiàn)一些自定義邏輯回調(diào)方法實(shí)現(xiàn)。
可以配置多個(gè)的BeanPostProcessor接口,控制這些的BeanPostProcessor接口,通過設(shè)置屬性順序執(zhí)行順序提供的BeanPostProcessor實(shí)現(xiàn)了Ordered接口。
BeanPostProcessor可以對bean(或?qū)ο螅┎僮鲗?shí)例,這意味著Spring IoC容器實(shí)例化一個(gè)bean實(shí)例,然后BeanPostProcessor的接口做好自己的工作。
ApplicationContext會(huì)自動(dòng)檢測已定義實(shí)現(xiàn)的BeanPostProcessor接口和注冊這些bean類為后置處理器,可然后通過在容器創(chuàng)建bean,在適當(dāng)時(shí)候調(diào)用任何bean。
示例:
下面的示例顯示如何編寫,注冊和使用BeanPostProcessor 可以在一個(gè)ApplicationContext 的上下文。
使用Eclipse IDE,然后按照下面的步驟來創(chuàng)建一個(gè)Spring應(yīng)用程序:

這里是 HelloWorld.java 文件的內(nèi)容:
|
1
2
3
4
5
6
7
8
9
10
11
12
13
14
15
16
17
18
19
20
21
|
package com.yiibai;public class HelloWorld { private String message; public void setMessage(String message){ this.message = message; } public void getMessage(){ System.out.println("Your Message : " + message); } public void init(){ System.out.println("Bean is going through init."); } public void destroy(){ System.out.println("Bean will destroy now."); }} |
這是實(shí)現(xiàn)BeanPostProcessor,之前和之后的任何bean的初始化它打印一個(gè)bean的名字非常簡單的例子。可以因?yàn)橛袃蓚€(gè)后處理器的方法對內(nèi)部bean對象訪問之前和實(shí)例化一個(gè)bean后執(zhí)行更復(fù)雜的邏輯。
這里是InitHelloWorld.java文件的內(nèi)容:
|
1
2
3
4
5
6
7
8
9
10
11
12
13
14
15
16
17
18
19
20
|
package com.yiibai;import org.springframework.beans.factory.config.BeanPostProcessor;import org.springframework.beans.BeansException;public class InitHelloWorld implements BeanPostProcessor { public Object postProcessBeforeInitialization(Object bean, String beanName) throws BeansException { System.out.println("BeforeInitialization : " + beanName); return bean; // you can return any other object as well } public Object postProcessAfterInitialization(Object bean, String beanName) throws BeansException { System.out.println("AfterInitialization : " + beanName); return bean; // you can return any other object as well }} |
以下是MainApp.java 文件的內(nèi)容。在這里,需要注冊一個(gè)關(guān)閉掛鉤registerShutdownHook() 是在AbstractApplicationContext類中聲明的方法。這將確保正常關(guān)閉,并調(diào)用相關(guān)的destroy方法。
|
1
2
3
4
5
6
7
8
9
10
11
12
13
14
15
16
|
package com.yiibai;import org.springframework.context.support.AbstractApplicationContext;import org.springframework.context.support.ClassPathXmlApplicationContext;public class MainApp { public static void main(String[] args) { AbstractApplicationContext context = new ClassPathXmlApplicationContext("Beans.xml"); HelloWorld obj = (HelloWorld) context.getBean("helloWorld"); obj.getMessage(); context.registerShutdownHook(); }} |
下面是init和destroy方法需要的配置文件beans.xml文件:
|
1
2
3
4
5
6
7
8
9
10
11
12
13
14
15
|
<?xml version="1.0" encoding="UTF-8"?><beans xmlns="http://www.springframework.org/schema/beans" xmlns:xsi="http://www.w3.org/2001/XMLSchema-instance" xsi:schemaLocation="http://www.springframework.org/schema/beans http://www.springframework.org/schema/beans/spring-beans-3.0.xsd"> <bean id="helloWorld" class="com.yiibai.HelloWorld" init-method="init" destroy-method="destroy"> <property name="message" value="Hello World!"/> </bean> <bean class="com.yiibai.InitHelloWorld" /></beans> |
創(chuàng)建源代碼和bean配置文件完成后,讓我們運(yùn)行應(yīng)用程序。如果一切順利,這將打印以下信息:
|
1
2
3
4
5
|
BeforeInitialization : helloWorldBean is going through init.AfterInitialization : helloWorldYour Message : Hello World!Bean will destroy now. |


